
Streamlabs is one of the most popular live streaming software solutions for creators, gamers, educators, businesses, and event organizers. However, if you want to stream to multiple platforms at the same time, you need a reliable multistreaming solution.
This guide explains how to connect Streamlabs to Yostream using a custom RTMP stream so you can broadcast to YouTube, Twitch, Facebook, Kick, LinkedIn Live, Rumble, and other platforms from a single stream.
Whether you're a beginner or an experienced streamer, the setup process takes only a few minutes.
What You Need Before Connecting Streamlabs To Yostream
Before you begin, make sure you have:
- A Streamlabs Desktop installation
- A Yostream account
- A stable internet connection
- Streaming destinations connected inside Yostream
- Administrator access to your streaming accounts
Once these requirements are ready, you can connect Streamlabs to Yostream using RTMP.
Why Connect Streamlabs To Yostream?
Connecting Streamlabs to Yostream allows you to:
- Multistream to multiple platforms simultaneously
- Reduce bandwidth consumption
- Manage stream destinations from one dashboard
- Broadcast to YouTube, Twitch, Facebook, Kick, LinkedIn Live, and more
- Reach a larger audience without running multiple streams
Instead of sending separate streams to each platform, Streamlabs sends one stream to Yostream, and Yostream distributes it to all connected destinations.
Step 1: Log Into Your Yostream Account
Open yostream.io in your browser.

Click Get Started in the top-right corner.
Sign in using:
- Email address
If signing in with email, enter the 6-digit verification code sent to your inbox.
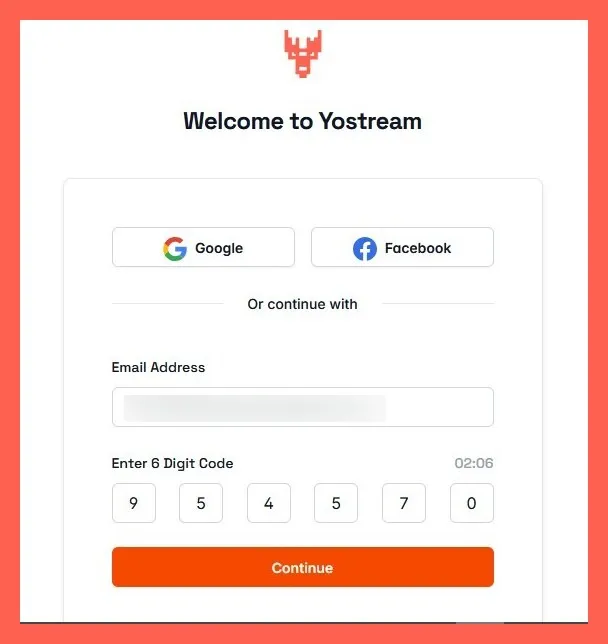
After authentication, you will enter the Yostream dashboard.

Step 2: Open The Connect OBS Section
After entering the dashboard, locate and select Connect OBS.

The page will display:
- RTMP URL
- Stream Key
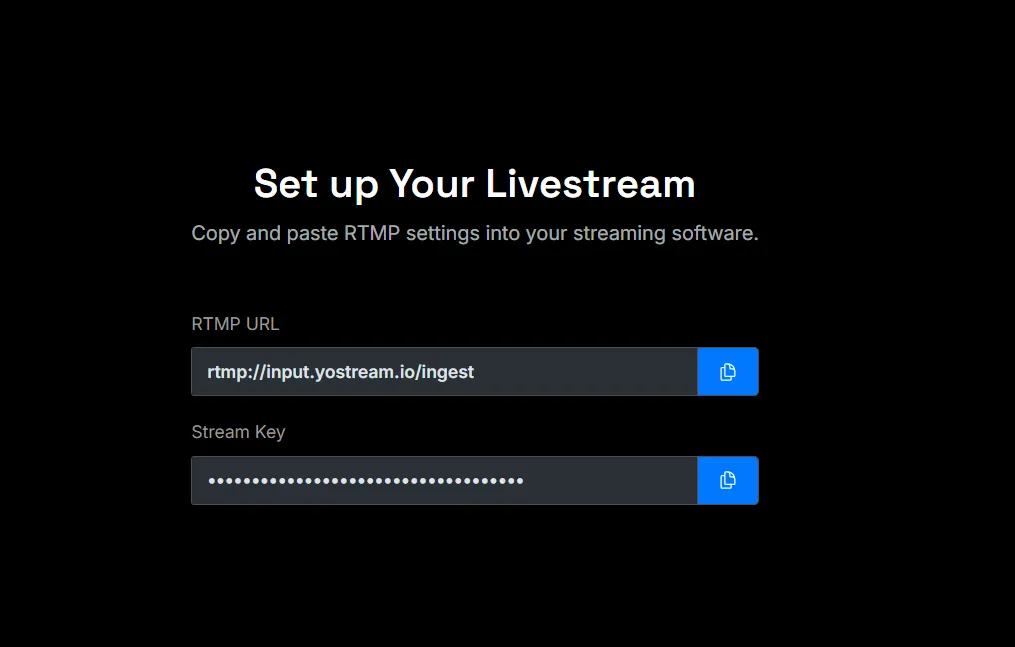
These credentials allow Streamlabs to send your stream directly to Yostream.
Keep this page open because you will need these values during Streamlabs configuration.
If you're a Yostream Pro user or above, there's another way to connect Streamlabs to Yostream using the RTMP Source feature.
From your dashboard, click Start Live Stream to enter the studio. Next, select Sources from the bottom toolbar and choose RTMP Source. Enter a source name, and Yostream will generate a dedicated RTMP URL and Stream Key. You can then copy these credentials into Streamlabs using the same Custom Streaming Server setup described below.
RTMP Source is designed for creators who want the flexibility of professional streaming software while still benefiting from Yostream's multistreaming capabilities. It allows you to send high-quality streams directly from Streamlabs, OBS Studio, vMix, Zoom, XSplit, and other RTMP-compatible encoders into Yostream. This means you can continue using your existing scenes, overlays, lower-thirds, multi-camera productions, webinars, gaming layouts, and advanced effects while taking advantage of Yostream's chat aggregation, analytics, branding tools, and multistream distribution. The result is a more powerful production workflow that combines professional-grade streaming with the simplicity of broadcasting to multiple platforms from a single destination.
Step 3: Copy The RTMP URL And Stream Key
Inside the Connect OBS section:
- Copy the RTMP URL.
- Copy the Stream Key.
- Store them temporarily in a secure location.
These credentials are unique to your account and should not be shared publicly.
Step 4: Open Streamlabs Desktop
Download, install, and launch Streamlabs Desktop on your computer.
Make sure:
- Your scenes are configured
- Audio sources are working
- Camera and microphone are detected
- Stream settings are accessible
Once Streamlabs is ready, proceed to the output settings.
Step 5: Configure A Custom RTMP Stream In Streamlabs
Inside Streamlabs:
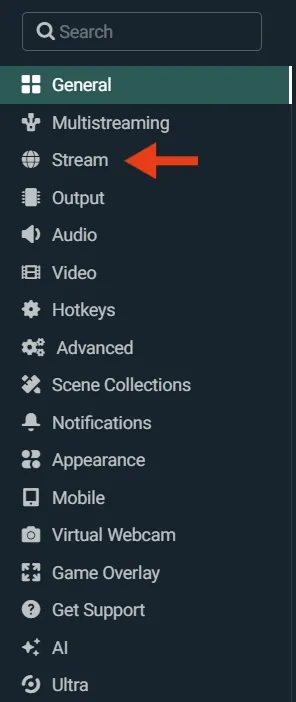
Click the Settings gear icon.
Select Stream from the left navigation menu.
Click Use recommended settings.

Scroll down the right panel, and select Add Custom Destination.
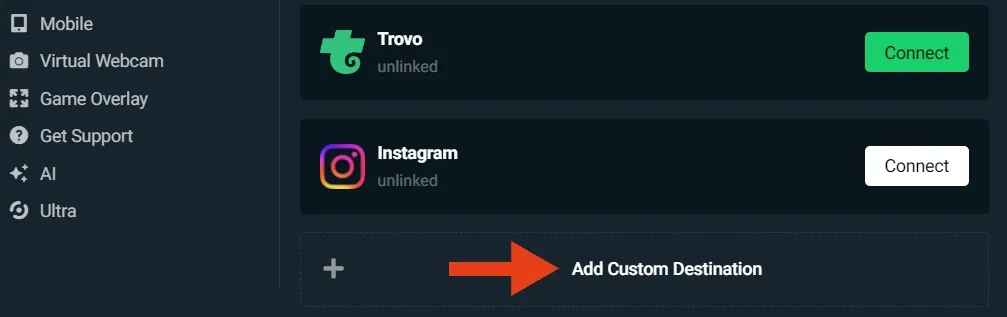
Enter a name, and paste the RTMP URL and Stream Key in the respective fields (from Step 3). Click Save.

Step 6: Connect Your Streaming Destinations In Yostream
Return to your Yostream dashboard.
Connect the platforms where you want to stream, such as:
- YouTube Live
- Twitch
- Facebook Live
- Kick
- LinkedIn Live
- Rumble
Select the destinations you want to broadcast to during your live stream.
Step 7: Start Your Stream
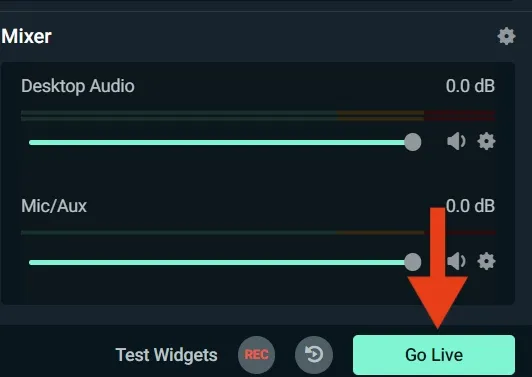
Inside Streamlabs:
- Click Go Live.
- Streamlabs will send the stream to Yostream.
- Yostream will automatically distribute the stream to your selected platforms.
You are now multistreaming from Streamlabs through Yostream.
Best Streamlabs Settings For Yostream
For most creators, the following settings provide reliable performance:
Video Settings
- Resolution: 1920×1080
- FPS: 30 or 60
Bitrate Settings
- 4500 to 6000 Kbps for 1080p
- 2500 to 4500 Kbps for 720p
Encoder Settings
- NVENC (recommended for NVIDIA GPUs)
- x264 for CPU encoding
Always match your bitrate with your internet upload speed.
How Multistreaming Through Yostream Reduces Bandwidth Usage
Without a multistreaming platform:
- Streamlabs sends separate streams to every platform.
- Bandwidth requirements increase significantly.
With Yostream:
- Streamlabs sends one stream.
- Yostream distributes it to multiple destinations.
This approach helps reduce upload bandwidth requirements and simplifies stream management.
Common Problems And Fixes
Streamlabs Cannot Connect To Server
Possible causes:
- Incorrect RTMP URL
- Incorrect Stream Key
- Firewall restrictions
- Internet connectivity issues
Verify the credentials inside the Connect OBS section of Yostream.
Stream Is Not Appearing On Streaming Platforms
Check that:
- Destinations are connected in Yostream
- The destination is selected before going live
- Platform authentication has not expired
Dropped Frames During Streaming
Possible causes:
- Insufficient upload speed
- High bitrate settings
- Network congestion
Lower the bitrate and test again.
Audio And Video Out Of Sync
Check:
- Audio delay filters
- Capture device settings
- Sample rate configuration
Use consistent audio settings across all devices.
Before You Start Your First Multistream
Take a few minutes to test your setup before going live publicly:
- Verify the RTMP URL and Stream Key
- Confirm all destinations are connected
- Check audio levels and microphone quality
- Review stream titles and descriptions
- Run a short private test stream
A quick test can prevent common issues such as dropped frames, missing audio, incorrect destinations, or stream interruptions during a live broadcast.